
Some friends and readers have been asking me to write more on bird photography and how I manage to get such sharp images. Well, today the day is bright and sunny – not the ideal conditions for bird photography. Thus I am willing to be distracted to write out this post.
During a bird photography exhibition in Dacca, Bangladesh some years back, I was ask to do the same – to give a talk on how I do it. The following are the points I made during that talk – the rules I follow when shooting birds. And I am rigid about the rules. Since I adopted the rules, I never broke them – even when certain situations called for breaking them.
1. HARD WORK
Top of the list is hard work. There is no substitute to hard work. I work very, very hard to get the kind of images I want. Without working hard, I will not get what I want.
2. ASA
I never, never, never, never, never shoot above 100 ASA, not even in desperate situations. At times I am tempted to crank up the ASA, like most other photographers do – to gain higher shutter speed when challenged with poor light conditions.
When I am presented with an opportunity to shoot a lifer (a new bird that I have the opportunity to photograph for the first time in my life), I am tempted to break the rules – but I don’t. Instead, I forego the opportunity of a lifetime. I could very well break my own rules and crank up the ASA because higher ASA means faster shutter speed. But that isn’t my aim – I am experienced enough to know that although I might get the images, they will most likely be grainy and soft. And if you are unable to frame the image properly and position the bird at the correct angle, because you are too far away or positioned in an inappropriate position, it will call for post-shoot cropping – to eliminate the unnecessary space and clutter around the bird. You can imagine the result – TERRIBLY FUZZY IMAGE.
My philosophy: What images I cannot use, I do not need.
3. FRAME RATE
Unlike most wildlife and sports photographers, I NEVER, EVER SHOOT continuous/multi-frame images. I shoot one frame at a time. Even during my photographic assignment to cover the fast paced tennis tournaments at the Wimbledon and Shanghai Masters, I was following my self-imposed rule – one frame at a time – inviting quizzical looks from other photographers around me.
Some very senior bird photographers are aghast at this rule – but they acknowledge that it would explain the clarity and sharpness of my images.
The reason is that multiple frame shooting means that the reflector mirror inside the camera will be flapping wildly, in the process jarring the camera body. The jarring results in camera shake – meaning the images will not be as sharp as it should be. Ofcourse now there are camera’s that are without mirrors. However, I am not sure that they are equipped with the traditional EF lens mounts. I am unlikely to find out since all my lenses are EF mount and it will be hugely expensive to migrate to mirror-less camera bodies because that means I need to buy whole new set of lenses costing me millions.
My endeavors will be NOT to take thousands of frames of images that are blurry. My aspirations are for just ONE FRAME that is sharp, well composed and well lit up.
4. TIME OF DAY
I never shoot during sunny days. I shoot from around 7AM until sunup. Generally birds are not very active during day anyway. But if the light is bright (not sunny) I will chase the birds. However if the sun is up, I will not shoot birds since the birds’ feathers reflect light and the colors come off all wrong. Thus the images are useless. I also shoot after sun down – but not for too long after it. A dull light is no good for bird photography – not even for any other photography – portraiture or scenery.
This is not to say that sunny days are all bad. There are situations when you will find that some isolated pockets are in the shade. You could find birds in those.
5. SHUTTER RELEASE
Generally photographers tend to be in a rush to photograph the bird the moment he/she sees it. That is the wrong approach – and a sure way to lose your bird. I take my time. I allow the bird to settle down – allow it to get used to my presence. No sudden moves …. easy and casual and totally unimpressed. Because bird photography is all about long lenses, we have to make sure that there is no camera shake – because the shake produced by a long lens is even more pronounced than those produced by shorter focal length lenses. Thus even when I begin to shoot ---- I make sure that the shutter release button is the only part of the camera that experiences a pressure – precise and concentrated on the shutter release button. Rest of the camera and lens must not feel the pressure during the process of depressing the shutter release button. Or there will be shake – resulting in not very sharp images.
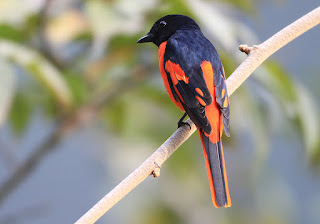
Look at the following two images – how sharp the images are and how beautifully I controlled the lighting and exposure. If you look at the image of the Ibisbill you will know how sharp the image is – you can practically count each and every scale on the leg of the bird. Then take a look at the image of the Scarlet Minivet – and you know what I mean by perfect and well controlled exposure. The colors scarlet and black are at opposite ends of the contrast scale – very strong colors individually ----- This calls for striking a balance between the two – to ensure that you compensate for both. As you can see, I managed that very well - you can see that the exposure is so well controlled that there is not a hint of over or under exposure of the individual colors – black comes off as black and the scarlet is beautifully scarlet! A mismanaged exposure would have ruined he image completely.

These are the five principal tips I have for the aspiring bird photographers – rest are less complicated but requiring of experience and skill that you will develop over the years. But as you know, the climb to the summit is a laborious one – there are no shortcuts – you have to keep trudging up - few feet at a time.
ENJOY!
And focus on the eye of an object that makes more clear even your subject is in cover or in open 😊😊
ReplyDeleteThank you for the knowledge la